

Showing posts with label Fine Motor. Show all posts
Showing posts with label Fine Motor. Show all posts
Wednesday, June 20, 2018
DIY American Flag Shirt


Wednesday, February 21, 2018
Imagination Play: Abracadabra
 Recently my 3 year
old nephew came to visit. He had a magic
wand that he wanted me to play with with him. I'm pretty sure if we had the time, he would have spent hours with me
playing with it. His favorite was to turn me
into a kitty and then back into myself while chasing me around the house. How fun it is to see the imagination of young
children.
Recently my 3 year
old nephew came to visit. He had a magic
wand that he wanted me to play with with him. I'm pretty sure if we had the time, he would have spent hours with me
playing with it. His favorite was to turn me
into a kitty and then back into myself while chasing me around the house. How fun it is to see the imagination of young
children. Wednesday, June 21, 2017
Guest Post: 3 Simple Ways to Prepare Your Kindergartner for Handwriting Success

Tera Robinson,
OTR/L is a Utah wife, mom and pediatric occupational therapist who loves
working as hard as she plays with all the kids in her life! You can visit her
blog, yumstheraplay.com,
or follow Yums Theraplay on Facebook or Instagram to learn more!
Summer break is just beginning and it always flies by too fast! It pains me to say it, but school will be starting again before we know it. Take advantage of summer time to brush up and prepare your child for the next school year!
As an occupational therapist, I often work with children to develop fine motor skills for activities such as handwriting and cutting. Even in our digital age, paper, pencils, crayons, scissors and glue will be used daily in your student's school day. Current research indicates that good, old-fashioned handwriting improves learning of letters, reading and helps retain information better than typing. Parents can implement some very simple, yet very effective strategies at home to prepare their child for handwriting success in kindergarten and beyond!
Summer break is just beginning and it always flies by too fast! It pains me to say it, but school will be starting again before we know it. Take advantage of summer time to brush up and prepare your child for the next school year!
As an occupational therapist, I often work with children to develop fine motor skills for activities such as handwriting and cutting. Even in our digital age, paper, pencils, crayons, scissors and glue will be used daily in your student's school day. Current research indicates that good, old-fashioned handwriting improves learning of letters, reading and helps retain information better than typing. Parents can implement some very simple, yet very effective strategies at home to prepare their child for handwriting success in kindergarten and beyond!
Wednesday, February 22, 2017
My 3 Year-Old Should Use Scissors? Say What?

Wednesday, July 13, 2016
"Red Hots Slime": Sensory Motor Fun!
 |
| Photo Credit |

Wednesday, January 6, 2016
Foaming Paint

Wednesday, November 18, 2015
Play Strengthens Your Child’s Development
 |
| Photo Credit |
Wednesday, July 22, 2015
Yoga with Baby
 |
| Photo Credit |
"Yoga movements can mimic the soothing rocking motion your baby felt while in the womb," Garabedian says. "This stimulates the relaxation response in both of you, helping you and your baby fall asleep easier and sleep longer." The National Association of Sports and Physical Education (NASPE) recommends that infants get daily physical activity, and yoga is a great, gentle place to start—and the perfect way to ease your baby into a lifelong appreciation for exercise” (Fit Pregnancy: Yoga Buddies).
 |
| Photo Credit |
Lie your baby on their tummy. Sit tall and straight to protect your back and help your posture. Begin by stroking from the shoulders to the hands; the baby should raise their head. Mini cobra is a great position to give your baby a gentle massage. From 12 weeks your baby will begin to lift their head by themselves whenever they are on their tummy.
Roller Coaster:
Sit with baby face down across your lap and cushion the floor under their head. Support with one hand on their back. Gently bend your leg under their chest to raise baby up, then lower. Bend your other leg under their hips to raise them so hips are slightly higher than head. Repeat a few times. Make sure you're sitting up straight. Good for babies older than at least 12 weeks old.
 |
| Photo Credit |
Knees to Chest:
Lie baby on their back. Hold your baby's legs around the calves and bend them open slightly wider than hips. Press baby's knees up to sides of abdomen under rib cage. Release pressure and relax completely. Repeat a few times. If baby resists or seems uncomfortable, try wiggling the leg gently to ease resistance or wait until later. Suitable for newborns.
 |
| Photo Credit |
Lie on your back with baby face-down on your chest. Bring your knees toward your chest and place baby tummy-down on your shins. Provide support by holding baby's torso at all times and support baby's head with your hands or knees. Lift your head and shoulders toward baby to tighten your abdominal muscles and play peek-a-boo with baby.
Lower your head and bring your knees closer to your chest. Hold for 10-20 seconds. Gently raise your shins up and lower them down to soothe baby and tighten your leg muscles. Repeat. Maintain eye contact and sing to your baby!
References:
2 simple Baby Yoga moves for Tummy Time
Colic? Try Baby Yoga
Yoga Buddies Workout Moves
Friday, March 13, 2015
Yer Always After Me Lucky Charms!
St. Patrick's Day is right around the corner and there are so many fun activities you can do with your kids to celebrate!
 |
| Photo Credit |
Green Pepper 4-Leaf Clovers!
What you'll need:
- green pepper
- green paint
- paint brush
- paper
While you're making these fun designs, you can share the legend of the 4-leaf clover with your kids! They might find it interesting to know that the 4 leaves represent Hope, Love, Faith, and Luck!
 |
| Photo Credit |
Edible Rainbow!
What you'll need:- Fruit Loop Cereal, Skittles, or M&Ms
- Cotton balls
- Paper
- White glue
Learn about the legend of how leprechauns keep their pots of gold at the end of rainbows. If you're good they may share their gold with you!
 |
| Photo Credit |
Paint the Rainbow!
What you'll need- Watercolor or acrylic paints
- paintbrush
- paper
You can even help your kids paint a pot of gold at one end of the rainbow! Just be creative.
 |
| Photo Credit |
If you have older kids...
Print out fun Crossword puzzles and Word Searches at this website.
Check out our Pinterest Board for even more St. Patrick's Day ideas!
And don't forget to wear GREEN!
What are some of your family's St. Patrick's Day traditions?
Tuesday, September 16, 2014
Is your Child Ready to Start Potty Training? Find Out How to Know if it's the Right Time!
Every new parent always has the same question of...

Although most children start potty training between 22 to 30 months, every child is going to start at a completely different time. One of the most important things to remember is that if you push your child to start early and they aren't ready then it can lead to frustration for both you and the child. Before children can begin to start potty training, they have to be able to have the basic motor skills mastered by themselves. Once they are physically ready for potty training then it's time to make sure they are emotionally ready! MamaOT shares some signs that your child may be ready to start the adventure of potty training:

“When should I start potty training my child”
Although most children start potty training between 22 to 30 months, every child is going to start at a completely different time. One of the most important things to remember is that if you push your child to start early and they aren't ready then it can lead to frustration for both you and the child. Before children can begin to start potty training, they have to be able to have the basic motor skills mastered by themselves. Once they are physically ready for potty training then it's time to make sure they are emotionally ready! MamaOT shares some signs that your child may be ready to start the adventure of potty training:
- Your child experiences discomfort when wet or soiled
- Your child indicates that he or she has a dirty diaper
- Your child has regular bowel movements on a fairly consistent basis
- Your child can sit on a potty for a short time when placed on it
- Your child demonstrates a pattern of being able to stay dry for about two hours or more at a time
- Your child can pull down their pants independently
- Your child demonstrates interest in watching and imitating other' bathroom-related actions
- Your child can follow basic directions
These are only a few of the list that MamaOT shares! Check out the link to see more detailed information.
Now that you have seen the signs that your child is ready, do you want to know some helpful tips? Kids Health has a great list of how to help with the potty training process, but just remember that it doesn't happen overnight.

- Set aside some time to devote to the potty-training process
- Don't force your child to sit on the toilet again his or her will
- Show your child how to sit on the toilet
- Establish a routine
- Try to catch your child in the act of pooping
- Have your child sit on the potty within 15 to 30 minutes after meals
- If your child has pooped in their pants, remove it from the diaper and put it in the toilet to teach children where poop goes
- Don't have uneasily removable clothing on children when potty training (Overalls, lots of layers of clothing)
- Allow your child to go a certain amount of time throughout the day without wearing a diaper. If they don't have an accident then you can reward them somehow
- For the boys: have "target practice"
- Reward your child with small things (stickers, stamps, etc.)
- Make sure all caregivers (babysitters, grandparents, childcare workers) follow the same routine of bathroom time and use the same names for body parts
Once you feel ready to conquer the task of starting the potty training process, remember to be patient with your child. It will happen and every child will be different!
Do any of you experienced potty-training parents have any suggestions or other tips that would be helpful to those parents struggling with teaching their child the tricks of potty-training?
Do any of you experienced potty-training parents have any suggestions or other tips that would be helpful to those parents struggling with teaching their child the tricks of potty-training?
Thursday, June 19, 2014
Packing Peanut Pool and Other Fine Motor Activities
Looking for simple and entertaining options for kids this summer? Want activities to assist in the development of fine motor skills? Here are a few ideas for you!
Swimming In Packing Peanuts
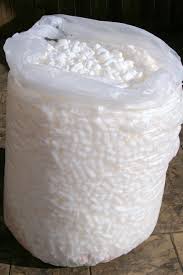 Want a drier option for your swimming pool? Fill a plastic toddler swimming pool with biodegradable packing peanuts (found at Walmart, Target or online). Prices vary by amount and size of the package. These are non toxic, not a choking hazard and not staticy (making clean up much easier!) They look like white cheese puffs so don't be too surprised when your child puts them in their mouth expecting something tasty. Place beach toys or kitchen utensils in the pool as well. Feel free to hid items in the pool as well. Watch your child pick up peanuts with large spoons or shovels. Feel free to join in the fun (we have!!) you won't regret the giggles created from a foam peanut fight! This will help in their fine motor development and sensory awareness.
Foam Blocks
Foam blocks allow children to build or put pieces together. Due to their softness they pose no danger of injury if they are (inevitably) thrown or if they fall on your child. These can be purchased in a number of different places such as Walmart or Target. Price usually ranges between $20-$40 depending on how many come in the pack. Show your child how to use the blocks in the following ways: carrying, sorting by shapes and colors, stacking, knocking down and cleaning up. This play will assist in problem solving, fine motor development and identifying shapes and colors.
Homemade Cardboard Blocks
You can buy cardboard blocks which tend to be larger (great for building larger forts). Expect them to be flat and need folding and assembling. OR you could save all those CapriSun boxes over the weeks, tape them shut, color or cover them with construction paper and go to town! With these blocks you can do many of the same activities as the foam blocks. These will also help with spacial awareness and cause and effect as you build and knock them down.
Swimming In Packing Peanuts
Foam blocks allow children to build or put pieces together. Due to their softness they pose no danger of injury if they are (inevitably) thrown or if they fall on your child. These can be purchased in a number of different places such as Walmart or Target. Price usually ranges between $20-$40 depending on how many come in the pack. Show your child how to use the blocks in the following ways: carrying, sorting by shapes and colors, stacking, knocking down and cleaning up. This play will assist in problem solving, fine motor development and identifying shapes and colors.
Homemade Cardboard Blocks
You can buy cardboard blocks which tend to be larger (great for building larger forts). Expect them to be flat and need folding and assembling. OR you could save all those CapriSun boxes over the weeks, tape them shut, color or cover them with construction paper and go to town! With these blocks you can do many of the same activities as the foam blocks. These will also help with spacial awareness and cause and effect as you build and knock them down.
Friday, April 4, 2014
Five Birds, One Stone
Today at our South Franklin Community Center Playgroup, we did the best little craft activity. This activity is awesome for five reasons.
1. It takes time and attention. Your little ones will love playing with the cereal, placing the pieces on the glue and coming up with different patterns.
2. ummm... Snack time and a craft all in one? You just can't go wrong.
3. This is an awesome opportunity to learn COLORS!
4. It will help develop your child's fine motor skills. Challenge the kids to stay inside the lines.
5. Who doesn't have all these supplies on hand. It is easy and cheap! So grab your glue, a printed design, any colorful cereal and get crafting!
Whether it comes out looking like this......

or this.....

Its a win! Happy Friday!
PS. This playgroup meets every Friday at 11 am. The first half hour we do free time playing with toys, then an activity, snack and a craft. All are welcome! The address is 770 South 700 West Provo Utah.
Tuesday, February 4, 2014
Baby Sign Language
Before
working at Help Me Grow, I ran the daycare for a local fitness company. I would watch the trainer’s children as they
worked out and there was one little girl in particular that I loved
watching. She was a little over one and
was probably the cutest thing I have ever seen in my life! One thing I noticed
with her though, was how she would respond to certain things I would say to her
with hand motions. I would ask if she
wanted a drink and she would put her hand up to her mouth as if she had a cup,
if I asked her if she wanted food she would put her little fingers up to her
mouth as if she was eating. I asked her
mom if she was learning sign language and she said yes! But she only knew a few
things so far and they were still working on it. I just thought this was the coolest thing, and now I really want to teach my kids to sign!

There
are many studies that show the benefits signing have on infant communication. Between 9 months and 2 years old children
begin to know what they want, need, and feel but they do not yet have the
verbal skills they need to communicate these things. Signing can ease the frustration children feel
and bridge the communication gap during this age range.
To begin
teaching your child how to sign, you first need to familiarize yourself with
common baby signs through books and websites. Here are a few online resources that are very helpful in learning how to teach your baby
signing. One of those is Baby Sign Language. They have
easy to follow steps for parents and access to a signing dictionary and flash
cards for practice. Another is Signing Time. They have products and information for children zero to eight. Lastly, there is a YouTube channel called My Smart Hands that has instructional videos for parents.
These
are some important things expert have found to be helpful in teaching children
how to sign:
Be Patient! Have realistic expectations about when to teach your infant to sign
and when you can expect them to sign back.
Most infants can begin communicating through signing around 8 to 9
months old.
Don’t
forget to communicate with your infant verbally as well. As long as signing does not replace verbal
communication, there should not be any negative effects of signing on learning
to talk.
Keep signs simple. Start with simple signs that have to do with everyday activities. Don’t get frustrated if your child does not do every sign perfectly! Signing is meant to relieve frustration, not add to it.
Keep signs simple. Start with simple signs that have to do with everyday activities. Don’t get frustrated if your child does not do every sign perfectly! Signing is meant to relieve frustration, not add to it.
Make it FUN!
Find fun, enjoyable activities to incorporate in their signing, such as dancing,
singing, and eating to keep their interest while they are learning.
Thursday, January 17, 2013
The Teeny Tiny Motor Movements
Tying shoes, turning pages, using a fork, picking up toys, throwing a ball. These are all the tiny fine motor movements of a young child. The ability to use hands and fingers with confidence is important for young children. These small muscle movements fun to watch develop and there are so many activities you can do with your child to help them as they improve their fine motor control. If you want to track your child's fine motor development, click here!
For example, one question asks “Does your 2 month old grasp your finger if you touch the palm of her hand?” or for a 14 moth old, "Does your baby throw a small ball with a forward motion?"

Fine motor milestones

 The following provides a basic outline of fine motor developmental
milestones. Remember each child is developing individually, so don’t become discouraged
if your child is not on track in all elements. If you are concerned about the
progress of your child, contact us here.
The following provides a basic outline of fine motor developmental
milestones. Remember each child is developing individually, so don’t become discouraged
if your child is not on track in all elements. If you are concerned about the
progress of your child, contact us here.
For example, one question asks “Does your 2 month old grasp your finger if you touch the palm of her hand?” or for a 14 moth old, "Does your baby throw a small ball with a forward motion?"


Fine motor milestones
Birth to 4 Months
Regards colorful object momentarily
Moves arms symmetrically, Brings hands to
Follows with eyes moving person while in multiple positions
Grasps toy actively
4 to 8 Months
Looks at distant and smaller objects. Can follow with eyes w/o moving head
Reaches for objects with both arms
Retains small object in both hands
Rakes at small objects
8 to 12 Months
Bangs 2 toys together at
Takes objects out of container
Releases objects voluntarily
Pokes with index finger
Uses crayon, tries to imitate scribbles
12 to 18 Months
Scribbles spontaneously
Puts 3 or more objects in container, dumps container to retrieve objects
Builds tower with at least 3 blocks
Points with index finger
Uses neat pincer grasp
18 to 24 Months
Imitates vertical and circular drawing strokes
Builds tower with 4+ blocks
Attempts to fold paper
24 to 36 Months
Holds crayon with fingers and thumb, imitates simple forms (cross)
Strings large beads
Snips with scissors
Folds paper in half
Imitates multiple forms with blocks

Doing fine motor activities together helps you as a parent observe your child's progress and strengthen your relationship and attachment. Check out our previous posts for great ideas of things you can do with your child to help improve their fine motor skills such as: cooking together, Parent-Child Yoga, or even making snow with scissors.
The following provides a basic outline of fine motor developmental
milestones. Remember each child is developing individually, so don’t become discouraged
if your child is not on track in all elements. If you are concerned about the
progress of your child, contact us here.Monday, October 29, 2012
Halloween Crafts Helping Development!
With Halloween creeping up on us this week, it's a great opportunity to have some fun with your child's development! One way to do that is to do some fun Halloween crafts! By getting your kids crafting, they're using their little fingers to develop fine motor skills. Fine motor skills are the coordination of small muscle movements in your body, like your fingers or your toes! The best way to develop those fine motor movements, is to do them!
Here are some fun, easy Halloween crafts to get those fingers moving!

Parents.com Hallowen Crafts
All Kids Network Halloween Crafts
Family Education Halloween Fun
Here are some fun, easy Halloween crafts to get those fingers moving!
- Paint a Pumpkin: draw silly faces or just make some awesome designs
- Apple Printing Pumpkins: cut an apple in half, put some orange paint and use it as a stamp! Draw silly faces to make them really look like pumpkins
- Make a Spooky Storybook: You can write a story on some paper and have your child make the illustrations to make a book!
- Lollipop Ghosts: tie a tissue around the sucker and draw some black eyes and you've got a ghost for a lollipop! (A great thing to give to friends or trick or treaters!)
- Hand Spiders: Dip your hands in black paint and press them on paper with your wrists together to make spiders! Your fingers will look like legs!
- Cookie Decorating: Get some fun cookie cutters and decorate them for Halloween!
- Mummy Cups: Wrap your snack cup in gauze or toilet paper and stick on some eyes to make them look like mummies.
- Carve Pumpkins: this is probably the most popular craft come Halloween! Just make sure that mom and dad are helping!
His little fingers will get lots of movement out of all of these fun activities, it's a so much more exciting to work on development when you're doing fun things!
For more ideas here are some sites:Parents.com Hallowen Crafts
All Kids Network Halloween Crafts
Family Education Halloween Fun
 |
| Photo Credit |
Subscribe to:
Posts (Atom)